
Alright everyone, so as I promised here is the Vampire choker instructions. My apologies for this being VERY late, but I completely forgot about it because when I went to post it initially blogger was doing maintenance and it totally slipped my mind! So here it is!
(Click on the images to enlarge)

Alright so I'm going to try and make this as quick and easy as possible! Here are some pictures of the things I used to create the choker (missing the cream colored ribbon, and the sewing machine, fabric glue, and gems)

In this photo: White thread, measuring tape, black embellishments with diamonds crystal edges (I bought these at a fabulous fabric store in Vancouver called Dressew), velcro, elastic banding.

In this photo: Wide antique white bridal lace (this is common stuff I see often, I picked it up in the bridal section of my dollar store), ball tip pins, needles, burgundy seam binding (the red picture just shows the brand, width, length, and all that jazz, this is also very common, I picked this up from Fabricland), and scissors

In this photo: Hot glue gun!
Dimensions

The width of the lace I used, as you can see, was 6 inches wide. (For me only 4 inches was needed)

The entire length of my choker measured 15 inches. Leave extra so that you can adjust it on your neck and it is comfortable! Remember that the back wraps around and covers the velcro so you lose several inches right there :)
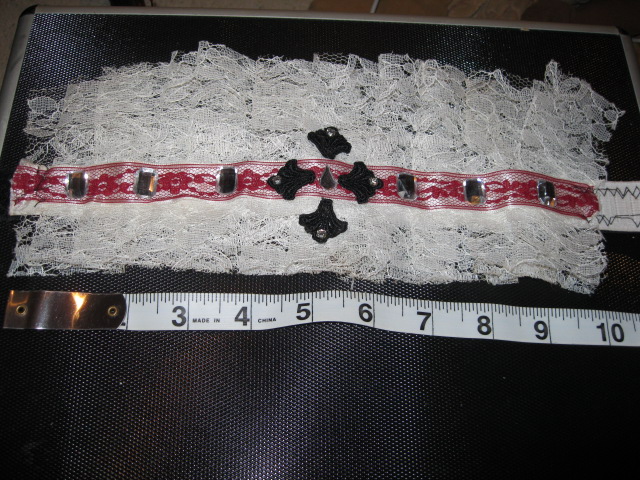
The length of the piece itself is only 10 inches, outside of the 10 inches is the elastic banding/velcro.

I trimmed my lace after I made the entire piece so that the fringe didn't go too far down my chest and sit weird. I trimmed it down to 4 inches.
Directions
Step 1:
The first thing I did was cut my lace. I used a fairly long piece of lace and then started to pleat it so that you could see about 1.25 - 1.5 inch pleats. This takes up quite a large amount of lace so I used more than I thought I needed (you can always cut more off later, but you can't add more on). To hold the pleats in place I secured each pleat with several ball point pins.
Step 2:
Once I had my pleats done, I cut a length of elastic banding that wrapped around my neck and had some wiggle room so I wasn't choking myself haha (for reference my neck is 10.5 inches) You want to cut the elastic band so that you have enough room on both sides to close over the velcro. I used extra room so that the velcro wouldn't come undone.
Step 3:
Take the needle and thread and begin stitching the elastic banding to the lace. I put the elastic in the very middle of my lace so that I got a kind of ruffled effect on both sides of the lace, kind of like a jesters neck ruff.

As you can see the stitching isn't perfect. My apologies for the makeup on the elastic, but since I wore this for Halloween the body makeup rubbed off on it.
Step 4:
The ribbon and seam binding. I took a 10 inch length of seam binding and used fabric clue to adhere it to a 10 inch piece of cream colored satin ribbon so that it would stand out against the lace. After that I attached it to the rest of the neck piece.
Step 5:
Embellishments! I had this brilliant idea that I was going to start a headband business and make fabulous headbands and the whole world would want them (HAH!) so I had all this stuff lying around. I had gone to a fantastic store in Vancouver called Dressew that sold all different kinds of fabrics and anything you need to make pretty much any sort of clothing piece. So I bought little cloth embellishments with crystals on them, I had them in white and black, but used the black because they are more gothic. I laid them out to look like a cross in the middle of the choker and then adhered them with hot glue. Then I took a tear drop shaped gem and put it in the center (roundest part facing down). I also had a ton of Martha Stewart scrapbooking self adhesive gems (that I picked up from Walmart) kicking around and placed 3 on each side equal-ish distances apart.
Step 6:
Step 7:
This is where I made my adjustments to the length of my choker. I wrapped it around my neck and trimmed it where it was too long (for me this was close to my collar bone). I trimmed 2 inches off the bottom and volia! A choker! I made two of them, and it really doesn't take all that long at all!! Super easy and quick, and really made everything come together I think! :)
Hope you enjoyed!! :)
0 comments:
Post a Comment