
Hi everyone!
So this is my first blog post, I figured now is as good a time as any to start making some blog posts! I just uploaded a cranberry eyeshadow tutorial to bring out green eyes. I think I'll do more of these videos for various eye colors! Let me know if that's something you guys would like to see! Below I'll have all the steps on how I achieved this look and skip to the end if you just want a list of the products I used. I'll have list of the products I applied to my face and lips as well even though this wasn't incorporated into the video for timing purposes!
Eyes (steps, list of products will be below):


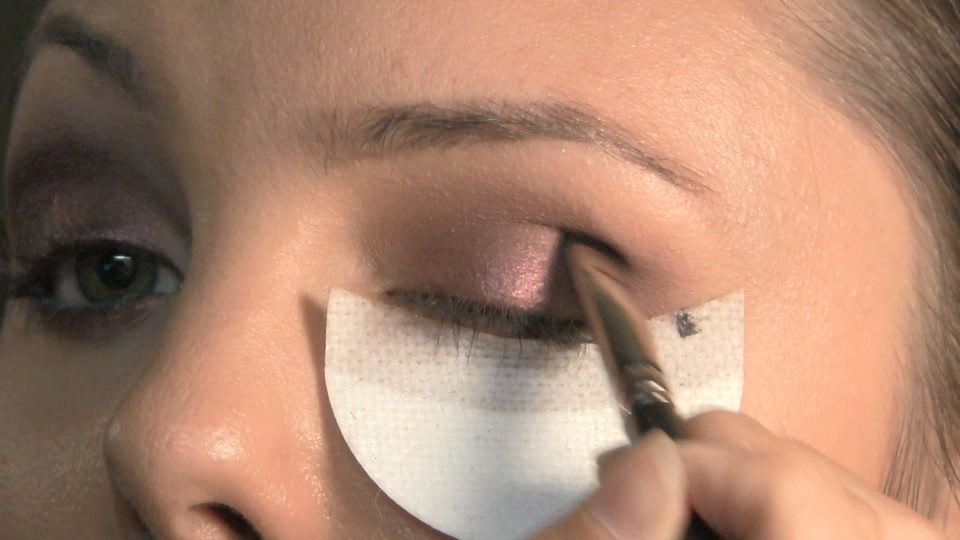
 I just recently picked up this wonderful invention that I bought at Sephora called Shadow Shields that are self adhesive and can be used several times each before discarding. For 12 dollars you get 30 of these little guys and they were well worth the purchase for me! I tend to get mascara and eyeshadow EVERYWHERE so these are wonderful for fallout! They also double as an edge for precise application of shadow, giving you that very defined line on the outer corner of your eye, which I LOVE.
Step 1:
I started off with my all time FAVORITE eyeshadow base:
Laura Mercier's Eye Basics in the color Wheat
 I applied it all over my lid with a big fluffy brush, the one I used is MAC's 225 brush which unfortunately is limited edition, but it is a GREAT multi purpose brush for quick blending, application of concealer, powder for specific areas, all over lid color, specific contouring, and a ton of other uses. It is one of my favourite brushes but I never use it on film because it is limited edition.
Step 2:
 Taking a dark or black cream shadow, I used Nars's cream shadow in the color Zardoz, which is SUPER creamy and pigmented, although it doesn't appear so because I applied it very minimally (although it is hard to tell because it is SO pigmented). A super cheap alternative would be to take NYX's jumbo pencil in the color Black Bean. Pick up some of your dark base on a concealer burs, (or any synthetic brush) and then apply that to your lid, using the brush to create your desired shape on the outer half of your lid (reserve the inner half of your lid).
 Step 3:
 Pick up some cranberry colored eyeshadow with a shader brush (mine's a 3 dollar brush from Walmart that I can't live without). The eyeshadow I used is Cranberry by MAC. Pat that all over the black and bring this into about the 2/5 mark of your lid (towards the inner corner), leaving the inner corner and first 1/5 bare for application of a flesh toned shadow.
 Step 4: Pick up some more of the cranberry shadow and wet with your choice of fluid, water/Fix +/Make Up For Ever's Mist & Fix/etc. This is for foiling the inner part of the lid, just above the pupil. It will create an intense sheen and basically resemble the shiny surface of tinfoil. This can't be done with matte shadows however. Also, make sure you pick the shadow up BEFORE wetting your brush or you'll create a seal over your shadow that will block off the top of your shadow and make it extremely difficult to pick up any pigment in the future. I used the same shader brush that I used with the cranberry shadow and patted the wet shadow in the centre my eye right above my iris. It was about the same width as my iris as well.
 Step 5: Blend the edges of the cranberry shadow along the crease. I used MAC's 224 blending brush. Try blending without closing your ring finger along the brush for smoother and lighter brush strokes! I find when I close my palm around the brush like I would hold a pencil, my brush strokes are heavy and too controlled and cause my brush to smash against my eye. I did windshield wiper motions back and forth and little circles in the outer corner. I find the little circles are especially easier with my ring finger disconnected from my brush!
Step 6: I used a shimmer purple from Coastal Scent's 88 Metal Mania palette (last row, 5 over from the right side, right next to the clip). I picked this up with a MAC 214 brush (which is a similar dense brush to the loved 239 brush, but it is thinner, more precise, and the hair's are shorter). I used this to place the purple color in the outer corner of my eye and into the crease. The color just adds a nice purple glow to the outer region of my eye, but could be omitted if you like.

 Step 7: At this stage I touched up my blending to make sure there were no harsh edges from the purple eyeshadow with the same MAC 224 brush.
Step 8: I picked up some Brule eyeshadow, which is a flesh tone beige color, with a MAC 219 pencil brush and highlighted my tear duct and inner 1/5 of my eye. I used the same color with a large MAC 227 paddle brush and highlighted under my eyebrow. This brush will also soften the edge of your shadow and refine the blending even more!


Step 9: Almost done! Haha. So at this point I take the same Coastal Scent's purple eyeshadow and I use it for a liner with Make Up For Ever's Eye Seal (a liquid which turns a powder shadow into a liquid liner), and Sonia Kashuk's Arc Liner brush. I put a couple drops of the Eye Seal into a dish and again pick up my shadow on my brush BEFORE wetting it, for the same reason as above. I line from the 2/5 of my eye outward, reserving the inner corner so as to not close off my eye. This doesn't add much more than a glossy, slightly more defined, upper lash line, because the color is so similar to that of the lid, so you could skip on this step if you wanted.


Step 10: I removed the shadow guard at this point and picked up some more of the MAC Cranberry and mixed it with MAC's Star Violet shadow and smudged it into my lower lash line with the 214 brush (not going into the tear duct though).


 Step 11: I then took Sephora's Flashy Liner (pencil liner) in the color Flashy Blue and lined my waterline. This step was to further make my green eyes seemingly more green. The contrast of the blue next to your eye will make the color more vibrant.
Face:
Foundation: NARS Sheer Glow Foundation in Barcelona, applied with a MAC 131 brush and then MAC Mineralize Skin Finish Natural in Medium used to set foundation with a MAC 182 kabuki brush.
Bronzer: Tarte's Mineral Bronzing Powder in Park Ave Princess buffed into face with the same MAC 182 brush. I used the one with shimmer but a matte one is also available in the same color.
Cheeks: MAC Earth to Earth Mineralize Blush applied to apples with a MAC 108 Brush and then highlighted with MAC Shimpagne Mineralize Skin Finish which sadly is limited edition (my FAVE! Soft and Gentle MSF which is permanent is absolutely identical when swatted!) It is incredibly pigmented though, which is why I used a long haired duo fibre for a very light application!
Eyebrows: Filled in with MAC lingering mechanical brow pencil.
Lips: MAC Equality lipstick
Eye makeup:
Laura Mercier Eye Basics Wheat
NARS Cream shadow in Zardoz
MAC Cranberry
MAC Brule
MAC Star Violet
Coastal Scent's 88 Metal Mania Palette purple eyeshadow (Last row, 5 over from right side)
Make Up For Ever Eye Seal
MAC Fix +
Sephora Flashy Liner in Flashy Blue
Lancome Hypnose Mascara
Cover Girl Lash Exact Fusion Mascara
Lipstick:
MAC Equality
Face products:
NARS Sheer Glow Foundation in Barcelona
MAC Mineralize Skin Finish in Medium Plus
Tarte Mineral Bronzing powder in Park Ave Princess
MAC Earth to Earth Mineralize blush
MAC Shimpagne Mineralize Skin Finish
Brushes (eye):
MAC 225
Quo Concealer brush
Walmart Large Shader Brush
MAC 214
MAC 219
MAC 224
MAC 227
Sonia Kashuk Arc Liner brush
Brushes (face):
MAC 131
MAC 188
MAC 108
MAC 182
Comment and let me know if you like when all the steps are written out or if you would just rather I only write down the product list! I thought I'd do both for my first blog post just to see how you guys felt about it! Also I have a poll going on at the moment and I'd love to know what you guys would like to see for my next video! I will do them in order of the numbers of votes if I get enough where I can determine places! :)
Hope you're all doing well, see you all in the next video or in the next post!
Love you all!
--K-A <3
Love your blog! your posts are so in-depth! Thanks for taking the time to do that! <3 Nikki
ReplyDeleteHow do you get your teeth so white?
ReplyDelete@Amy
ReplyDeleteHey there! Well last year during the summer I used those Crest white strips that stick to your teeth, I LOVE THEM, and then this summer for a bday gift I got a treatment done in office but the girl warned me that my teeth weren't likely to whiten (they were as light as the lightest shade they had available for post whitening swatches) because she said that Crest white strips work as well as in office bleaching (I had laser bleaching done) and that it just takes longer so that's why I didn't get any results. It's great news for future, but I was bummed at the time because I really wanted paper white teeth haha
Thanks so much for the question!
@Nikki
ReplyDeleteAwww thanks so much Nikki, I wanted to be able to explain what I did in the tutorial in case someone that didn't see the video saw this. Thanks so much for following me! I love your blog! <3 K-A
Love your videos! Do you use sephora flashy liners for a regular liner or specifically for inner lids. Do you have allergies to any makeup? Can you do a video on your skincare routine morning and night?
ReplyDelete@AnonymousAww thank you so much! I use the flashy liners for everything, on the waterline, above the lashline and on the lower lashline as well! Love them!!! I don't have allergies per se but I do break out very frequently from foundations if they have things like silicone or irritants in them. I have super sensitive skin! I will be doing a video hopefully sometime early this week if all goes as planned for my skincare routine! Thank you so much for your comment!! :)
ReplyDeleteHi beautiful girl! :) I also have green eyes so I want to try apply your tips. I already have some MAC cosmetics (it's my favorite) but I absolutely love that palette set you have (with cranberry color in it). How and where can I buy the whole set? I would really appreciate your advice!!! Thank you!
ReplyDelete@Maycha Hey girl, I'm so sorry to have to tell you this but I made that set myself by buying all the individual colors from MAC http://1.bp.blogspot.com/_aQHAOd7n7rM/TLbsUKwUVhI/AAAAAAAAAHM/lU1N5ZBCOQs/s1600/Reds+and+Purples+Palette.jpg is the actual palette with the names next to each color (some are limited edition and will have (L.E) in brackets under the eyeshadow color. And then the post on the eyeshadows is here: http://moonbeamshimmers.blogspot.com/2010/10/my-mac-eyeshadow-palettes.html
ReplyDeleteWhat I do is buy a MAC Palette (which you can buy in store or online, in store you need to ask a girl to get you one) and then I buy the eyeshadows in pan form which is also about 4 dollars cheaper than in the pot! :) I hope that helps.
I just came across your blog searching for cranberry eyeshadow. I recently did and "eras" photoshoot for a friend and the makeup artist used cranberry and I fell in love. my eyes had never looked so green!! Thank you for this tutorial! Ps....your eyelashes are gorgeous. any tips on how to lengthen/volumize for the same effect?
ReplyDelete